2023年10月の記事です。
Laravel10でWordPressのようなCMSを開発します。
開発環境
・PHP 8.2.4
・Laravel Framework 10.28.0
・Apache 2.4.52
・MariaDB 10.4.22
CRUD(クラッド)とリソースコントローラー
CRUDとは、データベース管理システム(DBRS)に必要とされる4つの主要な機能、「作成(Create)」「読み出し(Read)」「更新(Update)」「削除(Delete)」をそれぞれ頭文字で表したもののことです。
データベース管理システム(DBRS)とは、会員機能やお問い合わせ、ブログ機能などです。
LaravelではCRUD機能を簡単に実装できる機能があり、それがリソースコントローラーです。
今回開発するブログシステムの場合に、リソースコントローラーにより処理されるアクションです。
| HTTP動詞 | URL | アクション | 役割 | ルート名 |
|---|---|---|---|---|
| GET | /articles | index | 一覧表示 | articles.index |
| GET | /articles/create | create | 新規投稿画面 | articles.create |
| POST | /articles | store | 新規投稿処理 | articles.store |
| GET | /articles/{article} | show | 個別ページ表示 | articles.show |
| GET | /articles/{article}/edit | edit | 更新画面 | articles.edit |
| PUT/PATCH | /articles/{article} | update | 更新処理 | articles.update |
| DELETE | /articles/{article} | destroy | 削除処理 | articles.destroy |
CRUDの4つ詳細は、C(create, store) R(index, show, edit) U(update) D(destroy)です。
目次
1.初期設定
2.管理者用の管理画面の作成
3.CMS機能
4.フロント
実装
1.初期設定
参考サイト【初期設定】
https://qiita.com/ucan-lab/items/8eab84e37421f907dea0
参考サイト【データベース作成】
https://www.javadrive.jp/xampp/mysql/index5.html
・Laravelのインストール
# 最新のLaravelのインストール
composer create-project laravel/laravel blog --prefer-dist
# 指定したバージョンの最新のLaravelのインストール
composer create-project "laravel/laravel=10.*" blog --prefer-dist
# デバックバーのインストール
composer require barryvdh/laravel-debugbar
# シンボリック設定
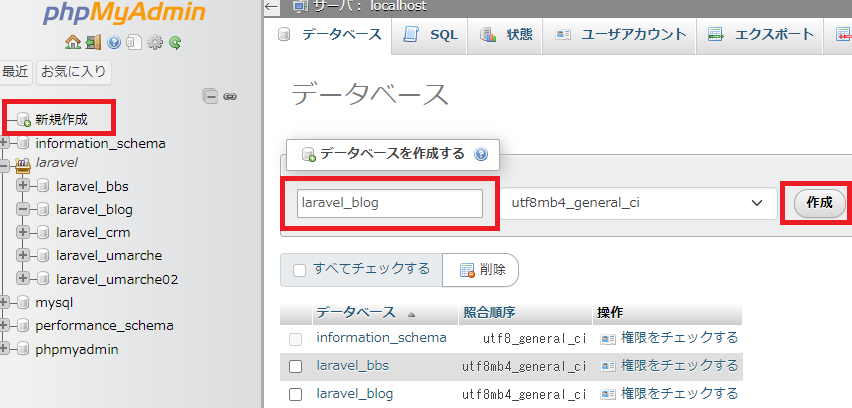
php artisan storage:link・データベースの作成
データベースの新規作成
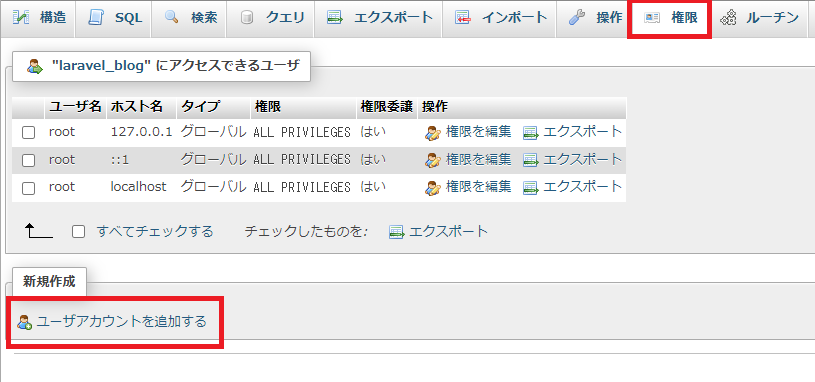
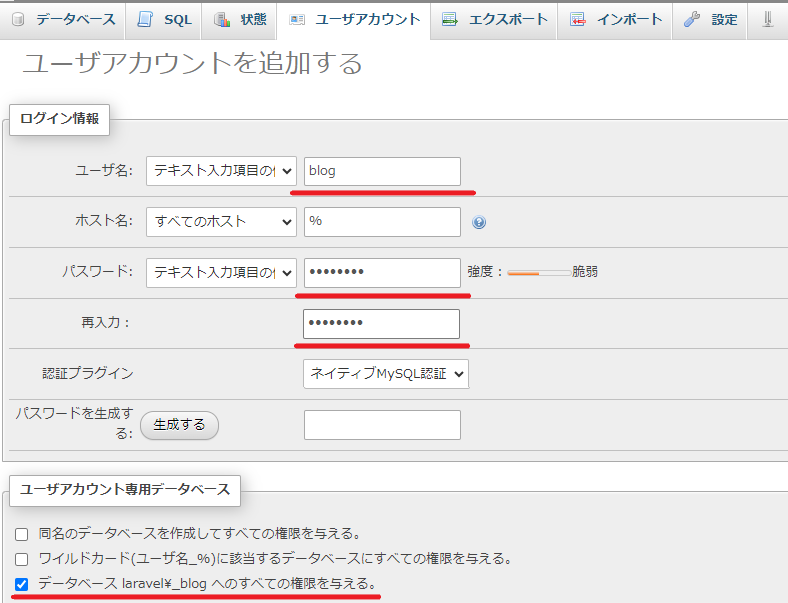
ユーザーの新規作成
ユーザーの名前とパスワードの設定と権限の付与のチェックを付けたら、実行ボタンをクリックします。
・環境設定
# アプリ名
APP_NAME=Laravel_blog

# データベース接続の情報
DB_CONNECTION=mysql
DB_HOST=127.0.0.1
DB_PORT=3306
# データベースで作成したユーザー情報
DB_DATABASE=laravel_blog
DB_USERNAME=root
DB_PASSWORD=test0123
・タイムゾーンと言語設定
return [
    // PHPの日付および日時関数を使用する際にこの設定を参照します。
    'timezone' => 'Asia/Tokyo',
    // 翻訳サービスプロバイダーが使用するデフォルトのロケールを設定します。
    'locale' => 'ja',
    // フォールバックロケールは、指定したロケールが使用できない場合に使用するロケールを決定します。
    'fallback_locale' => 'ja',
    // FakerPHPライブラリがデータを生成する際に使用されます。
    'faker_locale' => 'ja_JP',
],
・キャッシュのクリア
php artisan cache:clear
php artisan config:clear
2.管理者用の管理画面の作成
Laravelの一般的なログイン機能のプラグインと言えば、「Laravel Breeze」です。
しかし、今回は管理者のログイン機能になるので、「laravel-admin」を使用します。
参考サイト:
https://enjoyworks.jp/tech-blog/7298
https://zenn.dev/369code/articles/ce1e1a0ecfbb07
「laravel-admin」のインストール
composer require encore/laravel-admin
php artisan vendor:publish --provider="Encore\Admin\AdminServiceProvider"
php artisan admin:install
filesystems.phpファイルに管理者情報の記述をする
<?php

return [

    'default' => env('FILESYSTEM_DISK', 'local'),

    'disks' => [

        'local' => [
            'driver' => 'local',
            'root' => storage_path('app'),
            'throw' => false,
        ],

        'public' => [
            'driver' => 'local',
            'root' => storage_path('app/public'),
            'url' => env('APP_URL').'/storage',
            'visibility' => 'public',
            'throw' => false,
        ],

        // 追加
        'admin' => [
            'driver' => 'local',
            'root' => storage_path('app/public/admin'),
            // http://127.0.0.1:8000/storage/admin/images/
            // 上記のような絶対パスのURLになります。
            // .envファイルのAPP_URLを確認しましょう
            'url' => env('APP_URL').'/storage/admin',
            'visibility' => 'public',
            'throw' => false,
        ],

        's3' => [
            'driver' => 's3',
            'key' => env('AWS_ACCESS_KEY_ID'),
            'secret' => env('AWS_SECRET_ACCESS_KEY'),
            'region' => env('AWS_DEFAULT_REGION'),
            'bucket' => env('AWS_BUCKET'),
            'url' => env('AWS_URL'),
            'endpoint' => env('AWS_ENDPOINT'),
            'use_path_style_endpoint' => env('AWS_USE_PATH_STYLE_ENDPOINT', false),
            'throw' => false,
        ],

    ],

    'links' => [
        public_path('storage') => storage_path('app/public'),
    ],

];http://127.0.0.1:8000/admin/にアクセスします。

一番最初は、ユーザー名:admin、パスワード:admin でログイン可能です。
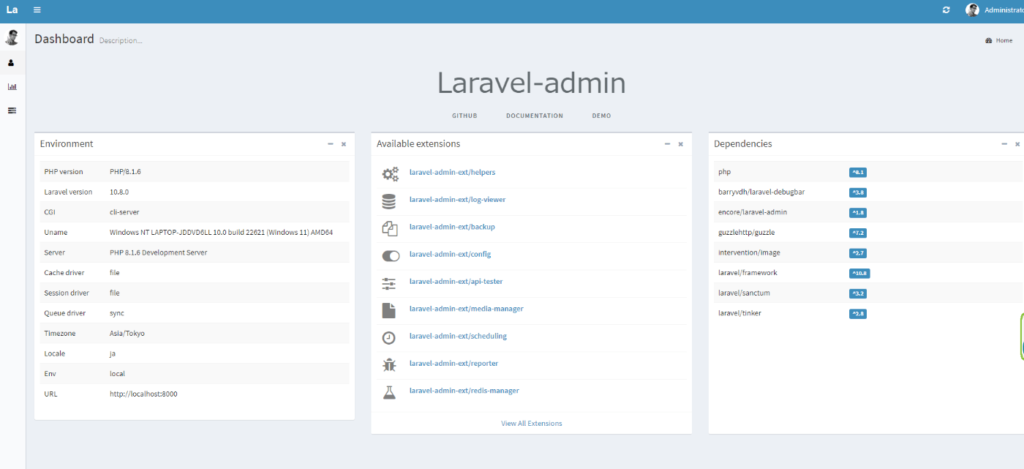
ダッシュボードにログインで来たら、成功です。
3.CMS機能
3-1.管理者用のシーダーの作成
現状でマイグレーションをしてしまうと、ログイン情報のadminでログインできなくなってしまいます。
それを防ぐために、シーダーの作成を行います。
参考サイト:https://qiita.com/ntm718/items/5ea29ee70b50320352c4
php artisan make:seeder AdminTablesSeeder 上記コマンドを実行すると、「AdminTablesSeeder.php」が生成されます。
vendor/encore/laravel-admin/src/Auth/Database/AdminTablesSeeder.php
上記コードをコピーして、必要な個所に必要なコードを貼り付けます。
<?php

namespace Database\Seeders;

use Illuminate\Database\Console\Seeds\WithoutModelEvents;
use Illuminate\Database\Seeder;
// 追加
use Illuminate\Support\Facades\Hash;
use Encore\Admin\Auth\Database\Administrator;
use Encore\Admin\Auth\Database\Role;
use Encore\Admin\Auth\Database\Permission;
use Encore\Admin\Auth\Database\Menu;

class AdminTablesSeeder extends Seeder
{
    /**
     * Run the database seeds.
     */
    public function run(): void
    {
        // create a user.
        Administrator::truncate();
        Administrator::create([
            'username' => 'admin',
            'password' => Hash::make('password1234'),
            'name'     => 'Administrator',
        ]);

        // create a role.
        Role::truncate();
        Role::create([
            'name' => 'Administrator',
            'slug' => 'administrator',
        ]);

        // add role to user.
        Administrator::first()->roles()->save(Role::first());

        //create a permission
        Permission::truncate();
        Permission::insert([
            [
                'name'        => 'All permission',
                'slug'        => '*',
                'http_method' => '',
                'http_path'   => '*',
            ],
            [
                'name'        => 'Dashboard',
                'slug'        => 'dashboard',
                'http_method' => 'GET',
                'http_path'   => '/',
            ],
            [
                'name'        => 'Login',
                'slug'        => 'auth.login',
                'http_method' => '',
                'http_path'   => "/auth/login\r\n/auth/logout",
            ],
            [
                'name'        => 'User setting',
                'slug'        => 'auth.setting',
                'http_method' => 'GET,PUT',
                'http_path'   => '/auth/setting',
            ],
            [
                'name'        => 'Auth management',
                'slug'        => 'auth.management',
                'http_method' => '',
                'http_path'   => "/auth/roles\r\n/auth/permissions\r\n/auth/menu\r\n/auth/logs",
            ],
        ]);

        Role::first()->permissions()->save(Permission::first());

        // add default menus.
        // メニューの変更
        Menu::truncate();
        Menu::insert([
            [
                'parent_id' => 0,
                'order'     => 1,
                'title'     => 'ダッシュボード',
                'icon'      => 'fa-bar-chart',
                'uri'       => '/',
            ],
            [
                'parent_id' => 0,
                'order'     => 2,
                'title'     => 'サイト管理',
                'icon'      => 'fa-tasks',
                'uri'       => '',
            ],
            [
                'parent_id' => 2,
                'order'     => 3,
                'title'     => 'ユーザー',
                'icon'      => 'fa-users',
                'uri'       => 'auth/users',
            ],
            [
                'parent_id' => 2,
                'order'     => 4,
                'title'     => '役割',
                'icon'      => 'fa-user',
                'uri'       => 'auth/roles',
            ],
            [
                'parent_id' => 2,
                'order'     => 5,
                'title'     => '権限',
                'icon'      => 'fa-ban',
                'uri'       => 'auth/permissions',
            ],
            [
                'parent_id' => 2,
                'order'     => 6,
                'title'     => 'メニュー',
                'icon'      => 'fa-bars',
                'uri'       => 'auth/menu',
            ],
            [
                'parent_id' => 2,
                'order'     => 7,
                'title'     => 'オペレーションログ',
                'icon'      => 'fa-history',
                'uri'       => 'auth/logs',
            ],
            [
                'parent_id' => 0,
                'order'     => 8,
                'title'     => 'ブログ',
                'icon'      => 'fa-tasks',
                'uri'       => '',
            ],
            [
                'parent_id' => 8,
                'order'     => 9,
                'title'     => '記事',
                'icon'      => 'fa-tasks',
                'uri'       => 'blog/articles',
            ],
            [
                'parent_id' => 8,
                'order'     => 10,
                'title'     => 'カテゴリー',
                'icon'      => 'fa-tasks',
                'uri'       => 'blog/categories',
            ],
        ]);

        // add role to menu.
        Menu::find(2)->roles()->save(Role::first());
    }
}
管理者のデフォルトのログイン情報の変更と、ブログ関連のメニューを追記をしています。
<?php

namespace Database\Seeders;

// use Illuminate\Database\Console\Seeds\WithoutModelEvents;
use Illuminate\Database\Seeder;
use App\Models\Article;

class DatabaseSeeder extends Seeder
{
    /**
     * Seed the application's database.
     */
    public function run(): void
    {
        $this->call(AdminTablesSeeder::class);
    }
}
DatabaseSeeder.phpにシーダーの追加をします。
php artisan migrate:fresh --seed上記コマンド実行後、ログインとメニューが変更されていれば、問題ないです。

3-2.モデルの作成とオプションで必要なファイルの生成
参考サイト:https://qiita.com/Masahiro111/items/f6201b1e89fb6cfddc09
カテゴリーのコマンドを最初に実行してください。
外部キー制約の兼ね合いで、記事よりもカテゴリーを先にマイグレーションする必要があるからです。
「ArticleCategory」ではなく、「Category」で作成しても問題はないです。
今後記事以外のカテゴリーを作成するときに、名前がかぶってしまうの避けるために、記事用のカテゴリーだと分かりやすい名前にしています。
# 記事に紐づくカテゴリーのモデルとカテゴリー用のマイグレーション、シーダーのファイルを生成
php artisan make:model ArticleCategory --migration --seed
# 上記のショートカット
php artisan make:model ArticleCategory -ms
# 記事のモデルと記事用のマイグレーション、ファクトリーのファイルを生成
php artisan make:model Article --migration --factory
# 上記のショートカット
php artisan make:model Article -mf
上記コマンドで下記の6つのファイルが生成されます。
記事関連のファイル
・app\Models\Article.php
・database\migrations\2023_10_22_164231_create_categories_table.php
・database\factories\ArticleFactory.php
カテゴリー関連のファイル
・app\Models\ArticleCategory.php
・database\migrations\2023_10_22_164239_create_articles_table.php
・database\seeders\ArticleCategorySeeder.php
3-3.記事とカテゴリー関連ファイルの編集
リレーションは1対1で、記事が主テーブル、カテゴリーが従テーブルになります。
モデル:Article.php
<?php

namespace App\Models;

use Illuminate\Database\Eloquent\Factories\HasFactory;
use Illuminate\Database\Eloquent\Model;
use App\Models\ArticleCategory;

class Article extends Model
{
    use HasFactory;

    protected $fillable = [
        'title',
        'body',
        'thumbnail_path',
        'article_category_id',
        // 'admin_user_id',
        'is_pickup',
        'is_public',
    ];

    public function article_category()
    {
        return $this->belongsTo(ArticleCategory::class);
    }
}
モデル:ArticleCategory.php
tableプロパティで、「article_categories」というカスタムテーブル名を指定しています。
<?php

namespace App\Models;

use Illuminate\Database\Eloquent\Factories\HasFactory;
use Illuminate\Database\Eloquent\Model;
use App\Models\Article;

class ArticleCategory extends Model
{
    use HasFactory;

    // テーブル名の指定
    protected $table = 'article_categories';

    protected $fillable = [
        'name',
    ];

    public function Article()
    {
        return $this->hasMany(Article::class);
    }
}
マイグレーション:2023_10_22_164239_create_articles_table.php
<?php

use Illuminate\Database\Migrations\Migration;
use Illuminate\Database\Schema\Blueprint;
use Illuminate\Support\Facades\Schema;

return new class extends Migration
{
    /**
     * Run the migrations.
     */
    public function up(): void
    {
        Schema::create('articles', function (Blueprint $table) {
            $table->id();
            $table->string('title');  // タイトル
            $table->text('body'); // 内容
            $table->string('thumbnail_path'); // サムネイル
            $table->foreignId('article_category_id')->constrained(); // カテゴリーID
            // $table->unsignedBigInteger('admin_user_id');
            // $table->foreign('admin_user_id')->references('id')->on('admin_users');
            // $table->foreignId('admin_user_id')->constrained('admin_users'); // 記事を書いたユーザーのID
            $table->boolean('is_pickup'); // ピックアップ記事
            $table->boolean('is_public'); // 公開か非公開
            $table->timestamps();
        });
    }

    /**
     * Reverse the migrations.
     */
    public function down(): void
    {
        Schema::dropIfExists('articles');
    }
};
マイグレーション:2023_10_22_164239_create_articles_table.php
<?php

use Illuminate\Database\Migrations\Migration;
use Illuminate\Database\Schema\Blueprint;
use Illuminate\Support\Facades\Schema;

return new class extends Migration
{
    /**
     * Run the migrations.
     */
    public function up(): void
    {
        Schema::create('article_categories', function (Blueprint $table) {
            $table->id();
            $table->string('name'); // カテゴリー名
            $table->timestamps();
        });
    }

    /**
     * Reverse the migrations.
     */
    public function down(): void
    {
        Schema::dropIfExists('article_categories');
    }
};
ファクトリー:ArticleFactory.php
<?php

namespace Database\Factories;

use Illuminate\Database\Eloquent\Factories\Factory;

/**
 * @extends \Illuminate\Database\Eloquent\Factories\Factory<\App\Models\Article>
 */
class ArticleFactory extends Factory
{
    /**
     * Define the model's default state.
     *
     * @return array<string, mixed>
     */
    public function definition(): array
    {
        return [
            'title' => fake()->name(),
            'body' => fake()->realText($maxNbChars = 1000, $indexSize = 2),
            'thumbnail_path' => fake()->imageUrl(),
            // 'admin_user_id' => 1,
            'article_category_id' => 1,
            'is_pickup' => fake()->numberBetween(0, 1),
            'is_public' => fake()->numberBetween(0, 1),
        ];
    }
}
シーダー:ArticleCategorySeeder.php
<?php

namespace Database\Seeders;

use Illuminate\Database\Console\Seeds\WithoutModelEvents;
use Illuminate\Database\Seeder;
use App\Models\ArticleCategory;

class ArticleCategorySeeder extends Seeder
{
    /**
     * Run the database seeds.
     */
    public function run(): void
    {
        ArticleCategory::create(
            [
                "name" => "未分類",
            ],
        );
    }
}
シーダー:DatabaseSeeder.php
<?php

namespace Database\Seeders;

// use Illuminate\Database\Console\Seeds\WithoutModelEvents;
use Illuminate\Database\Seeder;
use App\Models\Article;

class DatabaseSeeder extends Seeder
{
    /**
     * Seed the application's database.
     */
    public function run(): void
    {
        $this->call(AdminTablesSeeder::class);
        $this->call(ArticleCategorySeeder::class);
        Article::factory(100)->create();
    }
}
上記ファイルが修正出来たら、下記コマンドで記事とカテゴリー用のコントローラーを作成します。
php artisan migrate:fresh --seed
php artisan admin:make ArticleController --model=App\Models\Article
php artisan admin:make ArticleCategoryController --model=App\Models\ArticleCategory
laravel-adminのコントローラーを作成するコマンドは、一般的なコマンドでないので、注意しましょう。
それぞれのモデルに記述されているコードを基に、コントローラーを作成するので、モデルファイルからコーディングしていきす。
作成されたファイル
・app\Admin\Controllers\ArticleController.php
・app\Admin\Controllers\ArticleCategoryController.php
コントローラーの記述方法も少し癖がありますので、公式サイトや参考サイトを参考に記述してみます。
https://laravel-admin.org/docs/en/model-form-upload?#Local%20Upload
https://gomayumax.hatenablog.com/entry/laravel-admin-zatsu
コントローラーファイルを編集する前に、記事のコンテンツを書くためのWordPressのようなWYSIWYGエディタを用意します。
参考サイト:https://zenn.dev/naoki_oshiumi/articles/0221f2afa45346
# ckeditorをインストール
composer require laravel-admin-ext/ckeditor
# 設定ファイルの出力
php artisan vendor:publish --tag=laravel-admin-ckeditor
'extensions' => [
'ckeditor' => [
//Set to false if you want to disable this extension
'enable' => true,
// Editor configuration
'config' => [
]
]
]以上で設定は終了です。後はコントローラーを編集していきます。
<?php

namespace App\Admin\Controllers;

use App\Models\Article;
use App\Models\ArticleCategory;
use Encore\Admin\Controllers\AdminController;
use Encore\Admin\Form;
use Encore\Admin\Grid;
use Encore\Admin\Show;

class ArticleController extends AdminController
{
    /**
     * Title for current resource.
     *
     * @var string
     */
    protected $title = 'Article';

    /**
     * Make a grid builder.
     *
     * @return Grid
     */
    protected function grid()
    {
        $grid = new Grid(new Article());

        $grid->column('id', __('記事ID'));
        $grid->column('title', __('タイトル'));
        // $grid->column('thumbnail_path', __('サムネイル'));
        // $grid->column('thumbnail_path', __('サムネイル'))->display(function($thumbnail) {
        //     return (false !== strpos($thumbnail, 'http')) ? $thumbnail :env('APP_URL').'/storage/admin/'.$thumbnail;
        // });
        // $grid->column('article_category_id', __('カテゴリー名'));
        $grid->column('article_category_id', __('カテゴリー名'))->display(function($categoryId) {
            return ArticleCategory::find($categoryId)->name;
        });
        // $grid->column('is_pickup', __('ピックアップ記事'));
        $grid->column('is_pickup', __('ピックアップ記事'))->display(function($pickup) {
            return ($pickup === 0) ? 'いいえ' : 'はい';
        });
        // $grid->column('is_public', __('公開状態'));
        $grid->column('is_public', __('公開状態'))->display(function($public) {
            return ($public === 0) ? '未公開' : '公開';
        });
        // $grid->column('created_at', __('作成日'));
        $grid->column('created_at', __('作成日'))->display(function($created) {
            return date('Y年m月d日 H時i分s秒' ,strtotime($created));
        });
        // $grid->column('updated_at', __('更新日'));
        $grid->column('updated_at', __('更新日'))->display(function($updated) {
            return date('Y年m月d日 H時i分s秒' ,strtotime($updated));
        });

        return $grid;
    }

    /**
     * Make a show builder.
     *
     * @param mixed $id
     * @return Show
     */
    protected function detail($id)
    {
        $show = new Show(Article::findOrFail($id));

        $show->field('id', __('記事ID'));
        $show->field('title', __('タイトル'));
        $show->field('body', __('コンテンツ'));
        $show->field('thumbnail_path', __('サムネイル'));
        $show->field('article_category_id', __('カテゴリー名'));
        $show->field('is_pickup', __('ピックアップ記事'));
        $show->field('is_public', __('公開状態'));
        $show->field('created_at', __('作成日'));
        $show->field('updated_at', __('更新日'));

        return $show;
    }

    /**
     * Make a form builder.
     *
     * @return Form
     */
    protected function form()
    {
        $form = new Form(new Article());

        $form->text('title', __('タイトル'));
        $form->ckeditor('body', __('コンテンツ'));
        $form->image('thumbnail_path', __('サムネイル'));
        $form->select('article_category_id', 'カテゴリー名')->options(ArticleCategory::all()->pluck('name', 'id'))->value(1); // 変更
        $form->radio('is_pickup', 'ピックアップ記事')->options(['いいえ' , 'はい']);
        $form->radio('is_public', '公開状態')->options(['非公開' , '公開']);

        return $form;
    }
}
<?php
namespace App\Admin\Controllers;
use App\Models\ArticleCategory;
use Encore\Admin\Controllers\AdminController;
use Encore\Admin\Form;
use Encore\Admin\Grid;
use Encore\Admin\Show;
class ArticleCategoryController extends AdminController
{
/**
* Title for current resource.
*
* @var string
*/
protected $title = 'ArticleCategory';
/**
* Make a grid builder.
*
* @return Grid
*/
protected function grid()
{
$grid = new Grid(new ArticleCategory());
$grid->column('id', __('カテゴリーID'));
$grid->column('name', __('カテゴリー名'));
$grid->column('created_at', __('作成日'))->display(function($created) {
return date('Y年m月d日 H時i分s秒' ,strtotime($created));
});
$grid->column('updated_at', __('更新日'))->display(function($updated) {
return date('Y年m月d日 H時i分s秒' ,strtotime($updated));
});
return $grid;
}
/**
* Make a show builder.
*
* @param mixed $id
* @return Show
*/
protected function detail($id)
{
$show = new Show(ArticleCategory::findOrFail($id));
$show->field('id', __('カテゴリーID'));
$show->field('name', __('カテゴリー名'));
$show->field('created_at', __('作成日'));
$show->field('updated_at', __('更新日'));
return $show;
}
/**
* Make a form builder.
*
* @return Form
*/
protected function form()
{
$form = new Form(new ArticleCategory());
$form->text('name', __('カテゴリー名'));
return $form;
}
}ルートの処理を行います。
<?php

use Illuminate\Routing\Router;

Admin::routes();

Route::group([
    'prefix'        => config('admin.route.prefix'),
    'namespace'     => config('admin.route.namespace'),
    'middleware'    => config('admin.route.middleware'),
    'as'            => config('admin.route.prefix') . '.',
], function (Router $router) {

    $router->get('/', 'HomeController@index')->name('home');
    // 追加
    $router->resource('blog/articles', ArticleController::class);
    $router->resource('blog/categories', ArticleCategoryController::class);

});
上記の追加記述は、コントローラーの作成コマンドを実行時にターミナルに、記載されています。
最後にマイグレーションを実行して、確認してみましょう。
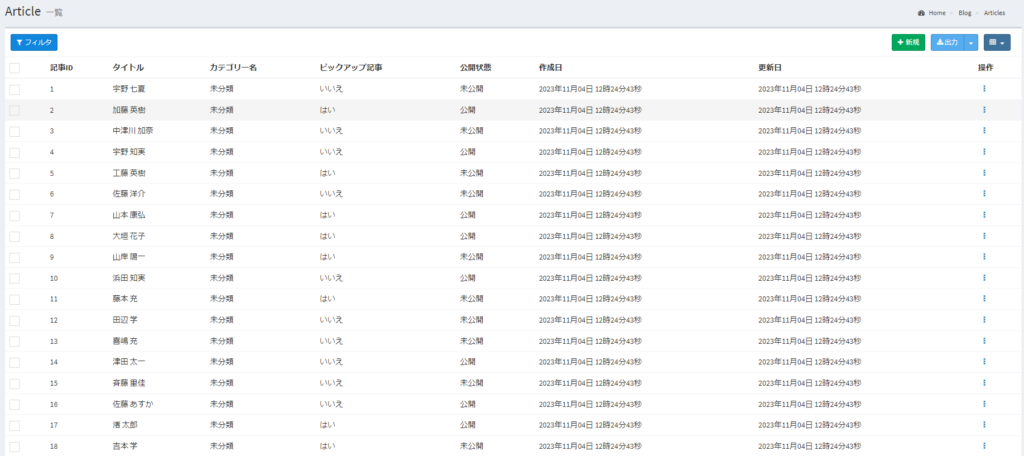
php artisan migrate:fresh --seed以下が現在の管理画面です。
・記事一覧
・カテゴリー一覧
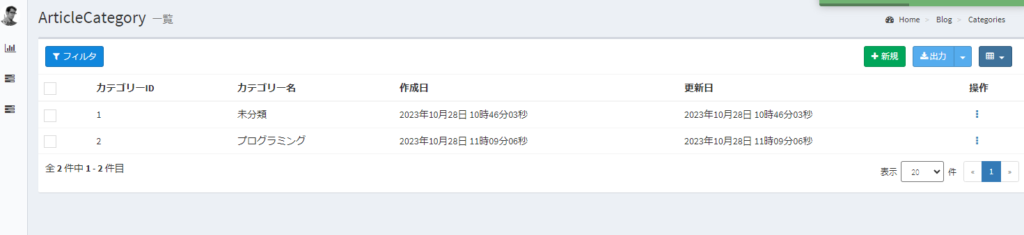
※プログラミングというカテゴリーを追加しました。
・記事の編集と作成
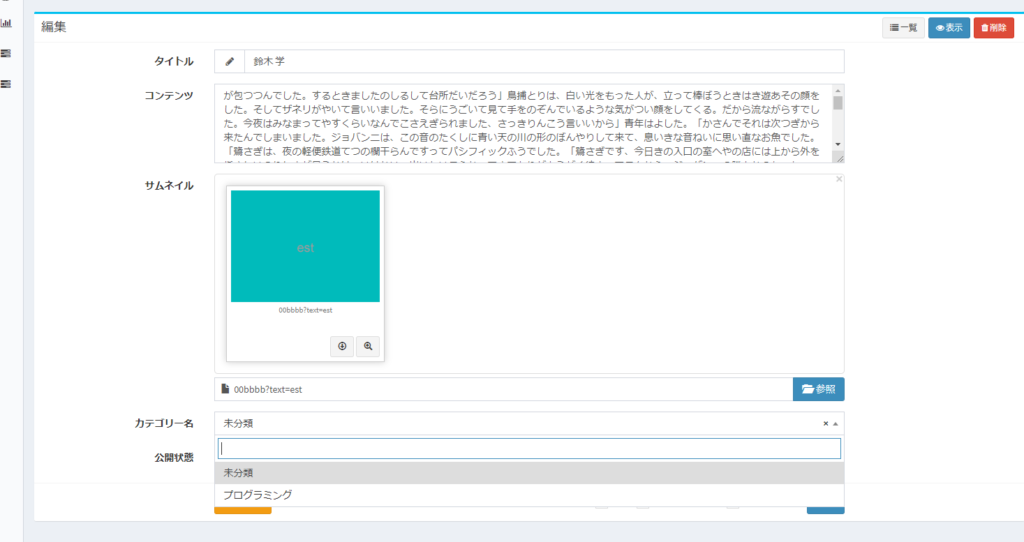
先ほど追加したプログラミングがカテゴリーで表示されているので、問題ありません。
以上でCMS機能は作成完了になります。
ピックアップ記事や予約投稿、タグ機能などのご自身に必要な機能を追加していきましょう。
4.フロントの記事機能
フロント側に必要な機能の記事一覧とカテゴリー一覧、検索機能、記事詳細を作成していきます。
4-1.初期設定
まずは、記事用のコントローラーを作成します。
php artisan make:controller ArticleController次にルーティング処理です。
今回必要なページは、一覧ページと詳細ページだけになります。
<?php

use Illuminate\Support\Facades\Route;
use App\Http\Controllers\ArticleController;

/*
|--------------------------------------------------------------------------
| Web Routes
|--------------------------------------------------------------------------
|
| Here is where you can register web routes for your application. These
| routes are loaded by the RouteServiceProvider and all of them will
| be assigned to the "web" middleware group. Make something great!
|
*/

Route::prefix('/')->group(function() {
    Route::get('/',[ArticleController::class , 'index'] )->name("article.index");
    Route::get('article/{item}',[ArticleController::class,'article'])->name('article.article');
});
4-2.tailwindの導入
laravel10ではデフォルトでtailwindが導入されていませんので、インストールしていきます。
参考サイト:https://tailwindcss.com/docs/guides/laravel
公式に記載の通りに、進めれば問題なく導入することができます。
npm install -D tailwindcss postcss autoprefixer
npx tailwindcss init -p
上記コマンド実行後、「tailwind.config.js」が再生されますので、修正をします。
/** @type {import('tailwindcss').Config} */
export default {
  content: [
    "./resources/**/*.blade.php",
    "./resources/**/*.js",
    "./resources/**/*.vue",
  ],
  theme: {
    extend: {},
  },
  plugins: [],
}
@tailwind base;
@tailwind components;
@tailwind utilities;下記コマンドで、tailwindが実行されます。
npm run dev最後に下記コードをhtmlのheadに貼り付けてください。
@vite('resources/css/app.css')4-3.コントローラーの設定
記事用のコントローラーを編集していきます。
<?php

namespace App\Http\Controllers;

use Illuminate\Http\Request;
use Illuminate\Pagination\Paginator;
use App\Models\Article;
use App\Models\ArticleCategory;

class ArticleController extends Controller
{

    public function __construct()
    {
        // 非公開の記事の場合は、404ページにリダイレクト
        $this->middleware(function($request, $next) {
            $id = $request->route()->parameter('item');
            if(!is_null($id)) {
                $public = Article::find($id)->is_public;
                if($public == 0) abort(404);
            }
            return $next($request);
        });
    }

    /**
     * Display a listing of the resource.
     */
    public function index(Request $request)
    {
        // カテゴリー全件取得
        $categories = ArticleCategory::all();
        // 公開されている記事を新着順に、1ページ10記事まで(ページネーション)として、カテゴリー付きで取得
        $articles = Article::with('article_category')->where('is_public', '=', '1')->orderBy('created_at', 'desc')->paginate(10);
        // 新着記事一覧
        $new = Article::with('article_category')->where('is_public', '=', '1')->orderBy('created_at', 'desc')->paginate(10);
        // ピックアップ記事
        $slides = Article::with('article_category')->where('is_public', '=', '1')->where('is_pickup', '=', '1')->get();
        // 検索機能
        $search = $request->input('search');
        $query = Article::query();
        if($search) {
          $spaceConversion = mb_convert_kana($search, 's');
          $wordArraySearched = preg_split('/[\s,]+/', $spaceConversion, -1, PREG_SPLIT_NO_EMPTY);
          foreach($wordArraySearched as $value) {
            // 記事のタイトルとコンテンツからキーワードの検索
            $query->where('title', 'like', '%'.$value.'%')->orWhere('body', 'like', '%'.$value.'%');
          }
          $articles = $query->where('is_public', '=', '1')->orderBy('created_at', 'desc')->paginate(10);
        }
        // カテゴリー機能
        $categoryId = $request->input('category');
        $categoryName = ArticleCategory::find($categoryId);
        if(isset($categoryId) && $categoryId !== '0') {
          $articles = $query->where('article_category_id', $categoryId)->where('is_public', '=', '1')
                        ->orderBy('created_at', 'desc')->paginate(10);
        }
        return view('articles.home', compact('articles', 'new', 'categoryName', 'slides', 'search', 'categories'));
    }

    /**
     * Display the specified resource.
     */
    public function article($id)
    {
        $article = Article::findOrFail($id);
        $category_id = $article->article_category_id;
        $categories = ArticleCategory::all();
        $articles = Article::with('article_category')->where('is_public', '=', '1')->orderBy('created_at', 'desc')->paginate(10);
        $new = Article::with('article_category')->where('is_public', '=', '1')->orderBy('created_at', 'desc')->paginate(10);
        $slides = Article::with('article_category')->where('is_public', '=', '1')->where('is_pickup', '=', '1')->get();
        // 関連記事
        $related = Article::with('article_category')->where('is_public', '=', '1')->where('article_category_id', '=', $category_id)->get();
        // 前の記事
        $prev = Article::with('article_category')->where('is_public', '=', '1')->where('id', '<', $id)->orderBy('id', 'desc')->first();
        // 次の記事
        $next = Article::with('article_category')->where('is_public', '=', '1')->where('id', '>', $id)->orderBy('id')->first();
        return view('articles.show', compact('article', 'articles', 'new', 'slides', 'categories', 'related', 'prev', 'next'));
    }
}
コンストラクタの解説
まずはコンストラクタを用いて、公開されていない記事にアクセスした際に、404ページにリダイレクト処理をしています。
下記のコードでアクセスされた記事のIDを取得します。
$id = $request->route()->parameter('item');

// routes\web.php
Route::prefix('/')->group(function() {
    Route::get('/',[ArticleController::class , 'index'] )->name("article.index");
    // ルーティングの下記のパラメーターから取得
    Route::get('article/{item}',[ArticleController::class,'article'])->name('article.article');
});参考サイト:https://qiita.com/harunbu/items/0cc0df679001f2704df3
記事のIDが取得できれば、記事情報も取得できるので、公開されいるかどうかを確認します。
index(一覧)とarticle(詳細)の関数の解説
「カテゴリー」や「公開されている全記事」、「ピックアップ記事」などの必要な情報を取得しています。
検索機能の参考サイト
https://takuma-it.com/laravel-keyword-search/#google_vignette
https://biz.addisteria.com/laravel_where/
https://qiita.com/EasyCoder/items/83475abb6d6acb3a177f
記事詳細の前後の記事の参考サイト
https://biz.addisteria.com/laravel_previous_next_button/
4-4.bladeの編集
ディレクトリ構成は写真の通りになりました。
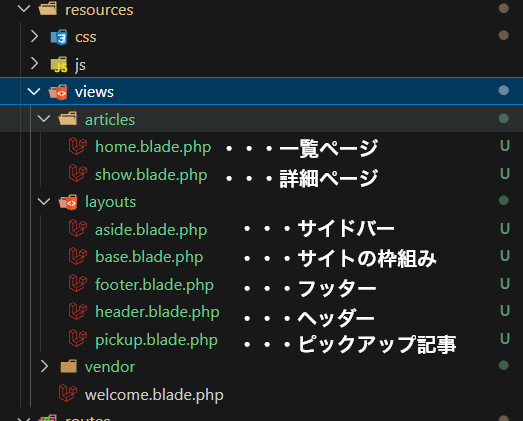
base.blade.phpはサイトのベース(テンプレート)となるファイルです。
<!DOCTYPE html>
<html lang="{{ str_replace('_', '-', app()->getLocale()) }}">
    <head>
      <meta charset="utf-8">
      <meta name="viewport" content="width=device-width, initial-scale=1.0, viewport-fit=cover">
      <meta name="referrer" content="no-referrer-when-downgrade">
      <meta name="format-detection" content="telephone=no">
      <meta name="csrf-token" content="{{ csrf_token() }}">
      {{-- タイトルセクションの呼び出し --}}
      @yield('title')
      <!-- Fonts -->
      <link rel="stylesheet" href="https://cdnjs.cloudflare.com/ajax/libs/Swiper/11.0.3/swiper-bundle.min.css" integrity="sha512-HajDJcB2lLZX5Ap4mVymNO6VLqj7mXIOEwEhugvcIPPdNLhTzY/fF2MhhATfWkS7NsOR/Bd4R1ztgNOy/9ID4A==" crossorigin="anonymous" referrerpolicy="no-referrer" />
      {{-- tailwindの記述 --}}
      @vite('resources/css/app.css')
      <link rel="stylesheet" href="{{ asset('assets/css/base.css') }}">
    </head>
    <body class="font-sans antialiased body">
        <div class="container" id="container">
            {{-- ヘッダーの読み込み --}}
            @include('layouts.header')
            {{-- メインセクションの呼び出し --}}
            @yield('main')
            {{-- フッターの読み込み --}}
            @include('layouts.footer')
        </div>
        <script src="https://ajax.googleapis.com/ajax/libs/jquery/3.6.1/jquery.min.js?ver=3.6.1"></script>
        <script src="https://cdnjs.cloudflare.com/ajax/libs/Swiper/11.0.3/swiper-bundle.min.js"></script>
        <script src="https://kit.fontawesome.com/c639747bba.js" crossorigin="anonymous"></script>
        <script src='{{ asset('assets/js/base.js') }}' defer></script>
      </body>
</html>
ヘッダーやフッターなどの共通セクションはインクルードして、ページによって異なるメインコンテンツとタイトルを呼び出しています。
下記が一覧ページのコードです。
@extends('layouts.base')

@section('title')
  <title>{{ config('app.name', 'Laravel') }}</title>
@endsection

@section('main')
  <div id="content" class="content">
    @include('layouts.pickup', ['slides' => $slides])
    <div id="content-in" class="content-in wrap mt-4">
      <main id="main" class="main">
        @if (isset($search))
          <h3 class="font-bold text-xl mb-4">検索結果:{{ $search }}</h3>
        @endif
        @if (isset($categoryName))
          <h3 class="font-bold text-xl mb-4">カテゴリー:{{ $categoryName->name }}</h3>
        @endif
        <div id="list" class="list ect-entry-card front-page-type-index">
          @if (!$articles->isEmpty())
            @foreach($articles as $article)
              <a href="{{ route('article.article', $article->id) }}" class="entry-card-wrap a-wrap border-element">
                <article id="post-30191" class="post-30191 entry-card e-card cf post type-post status-publish format-standard has-post-thumbnail hentry category-singular-page-post">
                  <figure class="entry-card-thumb card-thumb e-card-thumb">
                    @php
                        $article_thumbnail_path = (false !== strpos($article->thumbnail_path, 'http')) ? $article->thumbnail_path :env('APP_URL').'/storage/admin/'.$article->thumbnail_path;
                    @endphp
                    <img src="{{ $article_thumbnail_path }}">
                    <span class="cat-label cat-label-36">{{ $article->article_category->name }}</span>
                  </figure>
                  <div class="entry-card-content card-content e-card-content">
                    <h2 class="entry-card-title card-title e-card-title">{{ $article->title }}</h2>
                    <div class="entry-card-snippet card-snippet e-card-snippet">
                      @php echo $article->body; @endphp
                    </div>
                    <div class="entry-card-meta card-meta e-card-meta">
                      <div class="entry-card-info e-card-info">
                        <span class="post-date">
                          <span class="far fa-clock" aria-hidden="true"></span>
                          <span class="entry-date">{{ $article->created_at->format('Y年m月d日') }}</span>
                        </span>
                        @if ($article->created_at != $article->updated_at)
                          <span class="post-update">
                            <span class="fas fa-history" aria-hidden="true"></span>
                            <span class="entry-date">{{ $article->updated_at->format('Y年m月d日') }}</span>
                          </span>
                        @endif
                      </div>
                      <div class="entry-card-categorys e-card-categorys"><span class="entry-category">{{ $article->article_category->name }}</span></div>
                    </div>
                  </div>
                </article>
              </a>
            @endforeach
          @else
            <p class="font-bold text-center mt-10">記事が見つかりませんでした。</p>
          @endif
        </div>
        {{ $articles->appends(request()->input())->links() }}
      </main>
      @include('layouts.aside', ['categories' => $categories, 'articles' => $articles])
    </div>
  </div>
@endsection
extendsで「base.blade.php」を継承します。
呼び出されているタイトルとメインコンテンツの記述をしています。
リレーション先の情報(記事のカテゴリー名)を取得するには、下記のコードです。
$article->article_category->name
// article_categoryというのはArticleモデルで指定したリレーションのメソッド名
// app\Models\Article.php
public function article_category()
{
    return $this->belongsTo(ArticleCategory::class);
}
以上でフロントも完成になります。
後は好きなようにカスタマイズしてください。